Wednesday, September 12, 2012

Meal Planning 101

As a meal planning HATER for many years, I must say it has taken a small personal breakthrough for me to accomplish what you are about to see.  I am the kind of gal that RARELY uses a recipe, and LOATHES standing over a hot stove, especially on school nights when homework (or diapers, or our NEW PUPPY) are all awaiting my attention!  Meal planning just is not in my vocabulary.  We often throw something together at the last minute or settle for cereal on super busy nights.

Well, I finally got sick of that.  No longer am I standing in my kitchen, WELL past dinnertime, staring at the fridge wondering what I can concoct with the available ingredients.  Truly, it should be a food network series (if food network still had good old cooking shows, that is!) I was sick of the guessing game.

So, I made a list of the typical EASY meals I make for my family.  Then I charted them onto a 28 day calendar (so that I would have four weeks worth of meals).  I made sure to place the meals strategically. Like tacos on a night where there's football practice so I can guarantee a quick meal!

Then I made sure to have meatloaf and mashed potatoes two nights before shepherds Pie, so that I could make the pie using the leftover mashed potatoes.  A lot of thought went into the planning, and this is the hardest part.

Next, for each meal, I listed the ingredients it took to make it.  i omitted the obvious ingredients (like eggs, milk, or water to boil pasta, etc) because I know I always have those on hand.  This makes it easy to make your grocery list for the two weeks - and this REALLY helps know your grocery budget.

I just go through the ingredients for each meal and write out y list.  Then when i come across a duplicate ingredient (like onions) I make sure and increase the amount listed so I purchase enough for each meal.

Now, it may sound like a lot of work but it's the kind of job that if you do it right the first time, it pays off in the end and you won't have to do this dirty work again.  The rest is easy as you simply live with the certainty that you have EVERY ingredient you need for a wholesome dinner on a whim! No more drive-thrus, cuz we all know how I feel about those!

SO here is an image of my meal planning calendar:  It's very basic considering the fancy ones out there.  Websites sell meal planning software for an arm and a leg, but I'm a bit old fashioned.  Paper, scissors and tape is all it took for me.  This way I could move around the dinners as desired by simply unsticking my taped-on squares:)  This is VERY PROFESSIONAL, people!

Now for the disclaimer - weekday meals are simply fuel for my family.  There is NOTHING elaborate about these dinners.  I try to stay as simple as possible for my own sanity!  I often make the family much nicer meals but that's usually during the summer or on the weekends in the off-season! So the following meals are very simple, easy, quick ideas to throw together - AND they feed a family of 7 pretty darn well:)

As you can see, I am missing a couple of days worth of meals.  And that's a lot of Mexican for an Italian mamma, right?! Well let's face it, Mexican food is cheap and quick! Just my style!

Hopefully I will come up with some more EASY meal ideas soon.  I guess I should take a look at my recipes archive, huh?! But "easy" to me means it takes 30 minutes to make (Rachael Ray style) or I can prepare it ahead of time (i.e. crock pot).  So lasagne didn't make the cut:( I will work on getting recipes for most of my meals on the blog soon, but for now - here are some I've already shared:

Pasta & Gravy
Grilled Sausage & Zucchini Pie
Sloppy Joe's (Sloppy Giuseppes!)
Meatball Stew
Meatloaf 
Penne a la Vodka
Shepherds Pie Italiano


Saturday, August 11, 2012

Cupcakes in an Ice Cream Cone!


I had to make something for a bake sale and I had seen these done somewhere...maybe pinterest?  I thought I'd give it a try.....

And to save the general public from making the same mistakes I did, I thought I'd post some tips for a successful cupcake in a cone:


1.) Fill each cone with 1 - 2 TB batter.  NO MORE.  Trust me. The end.

2.) I used regular cake cones in a box, bought from the grocery store. I have heard of people using waffle cones but I am unsure as to how those would stand up - plus who wants to try that hard to make a cone stand up?! Really...

3.) Rest each cone in the muffin cups of a muffin tin (paper liners optional) as there could be some spillage, and this helps them to stand up well when baking.  It is also helpful to fill them when they're in there.

4.) Consider using a pastry tip and swirling the icing to make it look like soft serve.  That would be much cuter, in my opinion, then my uneven spreading of rainbow chip hydrogenated oil..........um, icing.


5.) I only bought one box of cones and had batter left over.  I used it to make my daughters 3 little ramekins full of cake.   I figured I would have been able to get another dozen at least - so buy 2 boxes per one box of cake mix (or one batch of your cake recipe, if you're doing it right and baking from scratch!)


Good luck! And has anyone else made these? I want pics!!

Tuesday, August 7, 2012

Tomato & Cheese Stuffed Sausage Meatballs


Okay for any of you locals, the restaurant Twigs has a pretty eclectic menu and I love it!!! It's not an Italian place, but last time I was there I tried this dish that was basically a breaded meatball.  But it was Italian sausage and inside was gooey mozarella cheese and a cherry tomato.  Can you say incredible?

No, really.......can you say it? SAY IT! Okay, good:)

Truly - these were amazing! Naturally I had to make my own copycat version at home, and I think I pretty much mastered it!  To make stuffing easiest, I would suggest starting with a big patty of sausage meat cupped in your hand.  Then fill it with the cheese (a cube or two) and a cherry tomato (smaller tomatoes works best).

Then, get some more meat on top and roll it into a meatball over the stuffing.  Next, roll the ball in some Panko breadcrumbs and fry in oil on the stove top.  Drain on a paper towel, sprinkle with salt, and enjoy!! I love this with a side of marinara!

TIP: If your meatballs cook quicker on the outside than the inside, just finish them in a 350 degree oven for 10-15 minutes, depending on the size:)


Tuesday, July 17, 2012

Bite Size Caprese Salad!!


This is a fabulous summer party appetizer since it can easily be eaten without a plate and a fork!  


It's a casual twist on an elegant classic!! 


Just cut your cherry tomatoes, and place them cut side down on a plate.  Top with a basil leaf, and a cube or ball of fresh mozarella, and you're done!!!

Crack some fresh black pepper over the top and drizzle with balsamic and olive oil if you wish:)  Super easy and can be made ahead of time, the day of your party!  Buon Appetito!

Monday, June 25, 2012

Italian Mothers and Italian Mother-In-Laws

As I have embarked on the journey that is motherhood, I have learned some very valuable lessons - like not running over to my kid the minute they fall, otherwise they actually will cry....

Or how very cool ice cream can make potty training sound to a 3 year old...

And even the really important lessons - like what kind of mother I want to be to my sons and daughters when THEY are parents.

You see, I got lucky since my mom is a pretty typical Italian grandma that yells at my kids without any qualms......and I LOVE IT!! Saves me the work, right?!  But I know not all people LOVE that as much as I do.  Will I have to hold myself back when I am a Grandma?  Will I reserve myself with my son's future wife (you know, the wife he will choose from my pre-approved list of my friends' cute daughters) since SHE is the mom and I shouldn't step on her toes?

Yikes! (yes, I just said Yikes, and yes, it is still a cool word)

That is a scary thought.  I am used to being the boss around here, and besides how could ANYONE else step in and raise the flesh of my flesh better than I?  (By that I mean my grandkids, since I'm pretty sure I will still think I know everything when I'm 60)

And what about spoiling my kids?  You know Italian Mothers are known for this one.  It was true for me, but I make my kids do EVERY bit of work they can around here, after all I am the queen of Laziness, remember?!

Well, I have a reader who has her own issues with an ITALIAN MOTHER IN LAW!  Although this mom-in-law may not be trying to raise her kids, she has done a heck of a job raising her Italian son to only be happy with her very own cooking.  This has made it nearly impossible for his non-Italian wife to please his palette!

From what I hear this is the true story with Italian men.  I married an Italian guy - kinda. His DAD is Italian, not his mom, so there wasn't too much competition on that end.  But here is a portion of an email I recently received:


Mamma,

I've read your blog quite a bit, snatching a few minutes here and there. I wanted to contact you privately because something you wrote struck a chord with me.  I'm a non-Italian married to a full-blooded Italian for ten years.  We have six children, four boys and two girls, ranging from age nine down to a two month old. 
  
I was reading your post on your children's birthdays, with all the stipulations your kids like to make for their birthday dinners.  It made me wonder if everybody is like that.  My husband's mother was such a great cook and spoiled him so rotten that I cannot do anything to please him.  Nothing steals my joy so much as seeing him sit down to dinner with the usual disappointed expression on his face.  I'd bake and cook 'till I'd drop, with a kitchen that was a disaster, until I was muttering all the things I'd like to do to him under my breath!  What a life.
 
 I finally decided my health and sanity were more important than trying to cater to him and I gave up on him.  I am so tired of cooking and wearing my patience and health thin.  Now I save time wherever I can, use whatever ingredients I have on hand to put together simple healthy meals, and I TOTALLY ignore my husband!  And I actually can laugh again, enjoy life with my kids, and know what it's like to finally have peace and joy once more.
 
My point is that this isn't a pleasant way to live.  For the sake of your kids' spouses someday, please don't set up a situation in which nobody can compete with a large pot and a big spoon.  There were days I used to sit there staring at the big sauce spoon and the big sauce pot, just hating them because I knew I couldn't compete.  I have since learned that there are things I can't change.  

Our tenth anniversary is coming up and I know we'll go to another fancy Italian restaurant in which the conversation (or monologue) will center around the merits of the various dishes.  Then we will watch Ciao Italia together and I will give him Mary Ann Esposito's latest cookbook as a gift....it's sort of a symbol that I know when to give up and bow out graciously....marriages get a bit crowded when you have to share it with other interests.  I used to try to fight it, but learned that it would be better for me and the kids to learn where my place is. 
 
Please take this in the spirit in which it is sent -- I love your blog and it's really cute, just wanted to mention this.

Signed,
Long time reader, first time commenter

Here was a part of my response:


Ciao! 
Thank you very much for your comments!!  Lucky for me, my husband's mother is not Italian, only his father is.  Also, the Italian cooking is fabulous on my side of the family, not his....and yet I do not even live up to my family's standards!! You see, I am a generation removed from the large families of my great grandparents.  My parents, Aunts, And Uncles did not have a lot of small children running around like I do, and therefore had more time to cook!  You know as well as I do - that cooking is not easy, especially with picky palettes and lots of them!

However, birthdays are the one time I let my children pick their favorite meal and spoil them rotten!! I do NOT cook like this every day - and believe me, whatever I'm cooking is what's for dinner - like it or not!  I am simply too busy to do otherwise!  There is an old Italian saying that says, "Mangiare Cuesta Minestra, O Saltare Cuesta Finestra."  LIterally, it means "Eat this soup or jump out this window!" -  A take it or leave it mentality!  I live by this:)

I understand your frustration and believe that it is not ALWAYS the case with Italian husbands, perhaps often but not always.  Food for Italians is  a memory in and of itself.  SO the food that your husband goes on about is really a memory and a feeling.  It is LOVE for Italians!!  I guess what I am trying to say is that your husband may inadvertently insult you with his disappointment in your lack of Italian cooking, when in actuality he's simply reliving and relishing a memory that is so hard for us Italians to part with.  A smell, a taste or a song is meaningful to all people - it's humanity's way of recognizing familiar things.  For Italians, we recognize much with our stomachs - with our palettes, if you will! I don't know how else to describe it...

How do you describe it?   Am I doing my son a disservice by making him homemade Italian meals that his future non-Italian (yikes!) wife cannot compete with?
 
Ciao!


IT'S FIG SEASON!!! Fig jam and goat cheese with truffle honey on toast!

GREAT Summer appetizer or party snack here.... Little toast or cracker with goat cheese, fig spread and a drizzle of truffle honey!! A sprig of rosemary and you are lookin pretty snazzy! YUM!!

WAIT! Where do I find ingredients for this?! 
Goat Cheese - look for a log of goat cheese that you can spread on yourself. (wait...do NOT spread goat cheese on yourself...just get a log of cheese that allows YOU to determine the amount you would like to spread on SOMETHING, like a cracker, or toast, not on you.) In other words, don't get the goat cheese crumbles.  Look at Costco or in your gourmet cheese section at the grocery store.


Fig Spread/Jam - I always have luck finding this in the gourmet section of TJ Maxx, or Trader Joes.  But while you are at TJ Maxx, do not pass up the chance to get yourself some Himalayan Pink Salt which I LOVE! And you might also want to stop by the housewares aisle to get yourself a nifty spanking spoon wooden spoon for making some awesome Sunday Gravy. And maybe the clearance rack to snag a cute dress for your daughter.........or five cute dresses, whatever.

Truffle Oil/ Truffly Honey - Trader Joes, or any good Italian Deli/Specialty shop!  I found white and black truffle oil at T.J, Maxx.  You could use either oil or honey for this appetizer - although the honey lends a certain sweetness that is perfect with the sharp, tangy goat cheese.

Pepper Crusted Filet Mignon with Balsamic Sauce

The best Filet Mignon I've ever had was at Smith & Wollensky Steak House in Las Vegas.  It was Steak Au Poivre, which is crusted in cracked black pepper with an equally peppery sauce to accompany it.  Ooooooh and Ruth's Chris Steak servd in melted butter is a close second...

However, since I will likely never live up to either of these entrees, I try to create my own gourmet sounding recipe here in my humble kitchen.  I tell you now, people, there is no easier way to impress with such little effort that with a BALSAMIC REDUCTION!

Doesn't it just sound fancy?!  Well it's not difficult, you really can't mess it up, and it tastes INCREDIBLE!
1.) Coat your filet with freshly cracked black pepper and some freshly ground pink salt (MY FAV!)

2.) Sear the Filets, then transfer them to a 300 degree oven to finsih cooking to your liking.

3.) Add 1-2 TB butter to the pan, stir up all those yummy bits of cracked pepper.  Add in mixture of 1 cup Balsamic Vinegar and 1 TB brown sugar (or 1 tsp agave) and reduce on medium-low heat until thickened.

4.) Pour over cooked filet and serve! THis is even better with some crumbled goat cheese on top! 

Thursday, May 10, 2012

Mamma's Pepperonata

If you are an avid "Mamma Meets The Cucina" fan, then you might recall when my foodie friend and blogging nemesis...(jk) Dominic Condo.... made Pepperonata for our Veggie Challenge.  It was pretty awesome, I must admit.  But I had to do what I always do and try to show him up!

Pepperonata is one of those dishes that is very hearty and can be a side dish or a meal in and of itself.  The way I make MY twist on Pepperonata, is a bit spicier and, actually quite different all around.  It lacks the onions seen in Cucina Domenico's recipe, and it uses whole baby peppers instead of sliced bell peppers. Throw in a couple Jalepenos for some kick and you've got a trendy twist on an Italian classic!!

Mamma's Pepperonata!
The instructions for my recipe are minimal - you wash and pan sear your peppers in a bit of e.v.o.o. and pancetta.  The flavor from the rendered panceta is the secret in this dish.  Then you finish them off in the oven, roasting at around 400 degrees, turning occasionally.  Serve alongside crispy Italian bread or with chunks fo fresh Parmiggiano!  Buon Appetito!

And don't forget, if you're a bit more traditional, check out Dom's recipe here!

Monday, April 2, 2012

Struffoli!!!


With Easter around the corner, no Italian household would dare be without some dyed eggs, "pizza gaina" and, of course, some struffoli!!!! Struffoli is a dessert often served at Easter or Christmas. Imagine little fried balls of dough tossed in sweet honey and sprinkles...how could every adult and child NOT love this tradition?!?! Sometimes pine nuts and cherries are used as decoration, but most often you'll find these dough balls tossed in diavulilli or literally, "little devils!" In my house, they are actually eaten by little devils...five of them!!!!

I promise that if you serve these up this Easter, you do not have to toss anything in little devils if you do not want to, nor will your children turn into little devils. The struffoli, however, may be just the devilish temptation you'll spend the next year avoiding - until Christmas, that is!

YOU WILL NEED:
  • 3 cups all-purpose flour
  • 4 eggs, beaten
  • 1/4 cup butter
  • 1/2 cup sugar
  • 1/2 teaspoon salt
  • 2 teaspoons baking powder
  • 1 tablespoon lemon zest
  • 1 1/2 cups honey
  • 3/4 cup pine nuts (optional in my house)
  • 2 1/4 ounces colored candy sprinkles

  • What To Do:

  1. Melt the butter or margarine over low heat. Mix together in a large bowl 2-1/2 cups of the flour. Add sugar, baking powder, lemon rind and salt. Make a depression in the middle. Drop into it the eggs and the melted butter or margarine. Mix with a wooden spoon and then with the hands until dough leaves the sides of the bowl. Add remaining 1/2 cup of flour as needed. Knead dough on floured surface until it isn't sticky anymore.
  2. Break off pieces of dough and roll into ropes about the size of a pencil. Cut into pieces 1/4 inch long. Roll these pieces into little balls and set aside.
  3. In deep frying pan, heat oil about 2 inches deep. Fry balls until golden brown. Drain on paper towels.
  4. In a large saucepan over medium heat, bring 1-1/2 cups of pure honey to a boil. Let honey boil gently for about 3 minutes before adding little dough balls, stirring gently with wooden spoon until they are well-coated.
  5. Remove balls from honey with a slotted spoon and place in a deep dish or mound them on a platter. Sprinkle surface evenly with nuts and multicolored sprinkles.
Recipe Courtesy of AllRecipes.com
Cool & Serve & ENJOY!!!!

Thursday, March 1, 2012

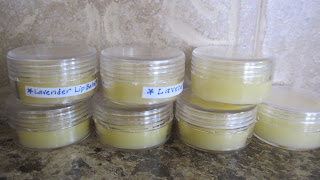
Homemade Chapstick - a.k.a "Mamma's Mintstick"

Get yourself some beeswax because this is one recipe you do NOT want to skip out on!!

Since we moved to a state where it actually gets cold in the winter, our family's desert skin and lips have been extra thirsty! So I did what I usually do and looked for a way to make my own natural version (just like with the laundry detergent, remember?!)

Well, once I picked up a few essential supplies, I realized it is actually super easy to make your own lip balm. I have a couple books that I love to reference. (Gorgeously Green, Back to Basics, Grow Your Own Drugs). Once you've got a specific formula, you can tweak your oils and flavors to your taste. We love that minty taste of the Burt's Bees stuff, so we used Peppermint essential oil in ours. I even made some with lavender essential oil! YUM!

Mamma's Mintstick ingredients:

This recipe will fill 8-9 lip balm tubes!

1 Tablespoon Coconut Oil

2 Tablespoons Sweet Almond Oil

1 Tablespoon & 1 teaspoon Beeswax

10 drops Peppermint essential oil


DIRECTIONS:
  1. Coarsely chop or grated your beeswax (vegans may use Carnauba Wax as an alternative), and place it in a small pot or glass pyrex measuring cup with your butters and carrier oils in the top of a double boiler, and melt gently over heated water. Make sure that the water does not boil over into your oil mixture, 1 -2” of water in the bottom of your pot is enough.
  2. Once that your beeswax mixture has melted, remove from burner, and add your essential oils. The essential oils will begin to dissipate with the scent, add more as needed.
  3. Immediately pour the hot mixture into lip balm containers. If the mixture cools too rapidly while you are pouring, then heat the mixture back up over the double boiler.
  4. Allow to cool completely (I usually wait overnight) before placing the caps onto your lip balm containers.
I bought these little plastic containers at Wal-Mart. I think they are for storing beads!!! But they work well as lip balm tins too. I also ordered some white chap stick tubes from Ebay which worked great! Even with this small recipe, you get such a high yield of product, that you can give them away as gifts and still have tons for your family! Everyone got a tube for Christmas and I still have a stash set aside for last minute gifts!

Also, I buy y sweet almond oil and coconut oil here. I have found this to be the best deal on prices for organic versions. You could easily switch out your sweet almond oil for sunflower oil or olive oil, but olive oil is a bit more greasy. I buy a block of beeswax from Mountain Rose Herbs, but you could get some form your local beekeeper! Also, Mountain Rose Herbs sells pellets of beeswax which is MUCH easier to measure as you do not have to grate it, you can simply measure it out like sugar!

My Kitchen Table Project: Refinishing a wood table from Craigslist!


For Italians (and humankind, I''m sure) the kitchen table is where EVERYTHING happens! Since my hubby and I got married we have had two kitchen tables - both of which were hand me downs from my parents. And boy were we grateful to get them! But they were never what we would have picked for our own home. We could eat on 'em - so it fit the bill!

When I finally got fed up with my current hand-me-down table being too big for our tiny eating area, I HAD to do something! S0 I did a little Craigslist shopping (after a LOT of online shopping.......er, dreaming) and found a steal of a deal! There was a SOLID WOOD table and five chairs. We swept it up for $85 and were thrilled to start working on it. Well, at least that's my side of the story.


If you asked my husband he was not so enthusiastic. He used words like "disgusting" and hideous" to describe the table - and the job I signed him up for! I decided I was going to channel the strength of my Italian Nonne before me and just get her done myself!!! I didn't need ANY help from ANYone! That is, until my sander died...

Then one day hubby comes home from Home Depot with a very cool palm sander and a not so cool receipt:( "I got the whole table for that price!!!" I screamed! .....I mean, said lovingly...

Then he was miraculously super excited to use his new power tool and started sanding. I didn't even have to ask him!!! I was pretty excited that I didn't have to do the hard part! But the KIDS DID!!!

So after a good sanding down to the bare wood - we picked out our stain and went to town.
Since by this point, PINTEREST had taken over my life, I had gotten a pretty good idea of some tables I wanted to copy. A sucker for Pottery Barn, I fell in love with the casual rustic flair that this table had:

One day, I will eventually get wood colored chairs, and get rid of these spindle ones ( I secretly HATE them) but for now I stained them to match. Also, the bench I already had from a previous Craigslist purchase!!! So I just stained it to match! Now it looks like a set. Since it was FREEZING out, I stained the entire thing in my living room! I used water based polyurethane to avoid the strong smells.
And after looking at it, I wanted the white legs to be a little more aged. But I was afraid of crossing the fine line between dirty and rustic. SO I employed the help of my artistic friend and had her teach me some faux glazing! IT was a blast and I learned A LOT about how to get it looking rustic.
I feel we did a pretty good job achieving my personal goal! And my husband ended up liking it too!! (one day, if its EVER clean - I will take a better pic and post it!)

Most of all - it was a FAMILY project that we all remember every time we gather around the kitchen table. Whether we're eating or doing homework, we are constantly reminded that we did this together! Now, we are no professionals, but we are excited to tackle more projects like this in the future! We learned so much of what to do and what NOT to do just on this table. Which is fine with us because our mistakes will likely be covered up by the ABUSE this thing will get from my five bambini!

Monday, February 13, 2012

Stuffed Tomatoes - 3 ways!

The tomato is quite possibly THE most versatile veggie there is.....or should I say, most versatile FRUIT! Which would then make the potato the front runner when it comes to versatility. And we all know how much I love potatoes - sweet potatoes, mashed potatoes, roasted potatoes - you name it!

But back to fruit....Tomatoes are awesome! They can take on just about any nationality at any given moment and work wonders. It makes sauce, salsa, soup, a sandwich filler, a burger topper. Tomatoes can be just about anything.....like talented chameleons....or really good scam artists...Or not. Perhaps they're simply a versatile cooking staple...

In any case, stuffing tomatoes is just about one of the funnest things you can do with 'em! Yes, I know "funnest" is not a word. I make up my own words quite often, get used to it. And talk about versatility - you can stuff these babies with just about anything! Well, not anything.... I would not recommend stuffing them with rocks, mud or leaves (my children's go-to mirepoix when "cooking dinner" in the yard). I strongly suggest cooking this dish in the actual kitchen.

So here are my 3 varieties when stuffing tomatoes - Italian style:

PREPARATION:
Cut the tops off of your tomatoes. Remove the inside, discarding the seeds and juice but saving the pulp. Stiff the empty tomatoes as follows:

Herb & Bread Crumb Stuffing
With this one I just mixed Italian seasoned bread crumbs, fresh parsley, grated romano cheese, and enough e.v.o.o. to make the mixture like wet sand. Mix in some of the tomato pulp. Top it with some shredded mozarella and romano cheeses and bake it off! YUM

Sausage, Herb, and Breadcrumb Stuffing
This one was by far my FAVORITE mix. I used the same method above (the herbs & bread crumbs & tomato) and added cooked ground Italian Sausage (out of the casing) and wow was that amazing! Top with the cheeses and bake.

Sausage & Rice stuffing
This one had no bread crumbs. I still used fresh parsley, tomatoes and cooked sausage. I mixed that with some cooked rice, lots of grated cheese, and a splash of white wine vinegar. Top with cheeses and bake. Here they are, ready to eat!

These are seriously SO easy to make. The only important thing to remember is to thoroughly mix your fillings before putting them into your tomatoes. I also placed the tomatoes really close together to bake so as to give them some stability in the oven. They held up very well. Buon Appetito!


Thursday, January 26, 2012

Homemade Mac and Cheese for the Birthday Girl - with Cake Pops!


Each of my kids gets to pick their dinner of choice on their birthday. This started as a cute and innocent tradition and has since developed into the very cause of my migraines! If there was a parenting course on "How to Teach your Children To Be Demanding Needy Little Tyrants," then I would graduate with honors.

As our kids have gotten older and smarter they now have very detailed stipulations on what exactly their birthday dinner will entail. For instance, my son usually asks for chicken soup. But not just any chicken soup - "the homemade kind, from whole roasted chicken bones, with mini meatballs and pieces of chicken....and the carrots need to be soft...and grated Romano cheese on top - heaping spoonfuls of grated Romano cheese," to be precise.

And then I lovingly smack them with my wooden spoon....I mean........ I give them a kiss and say, "Anything for the Birthday Boy!"

Well, this year my daughter was turning FIVE! Five is a HUGE deal to her since it means school is coming up this year. Also, I have learned a ton of new things about turning five. For instance, (straight from my daughter's mouth) "When you're five you don't take naps anymore." Or "I can ride my scooter in the house cuz I'm five." Everything she wants to do is now suddenly allowed at the age of five. In your dreams, kid.

SO this year the Birthday girl requested homemade macaroni and cheese. VERY cheesy macaroni and cheese with absolutely "NO ham" (here come those stipulations again). And she wanted it to look orange like the box of store bought 'Macaroni and Hydrogenated Oil' (some call it "Macaroni and Cheese"). Well, that wasn't happening because I used a wonderful gourmet blend of cheeses that were predominantly white! Yeah, that did not go over well. But in the end she loved it (and so did we cuz we got our yummy cheese fix) You know how I love my cheese.

So here is a recipe that I altered out of my trusty Betty Crocker cookbook. I switched up some ingredients and ratios and, of course, cheeses. But if you want to pick your own selection of cheese, just stick to the overall amount of cheese and pick cheeses that melt well. For instance, mozzarella would not be a good choice for this!

MACARONI AND CHEESE:

1 lb elbow macaroni
1/4 cup butter
1.4 cup flour
1 -2 tsp salt
black pepper, to taste
1/2 tsp Dijon mustard ( I added a bit more, it really does enhance the flavor!)
1/2 tsp Worcestershire sauce
4 cups milk
3 cups shredded cheeses that melt all creamy-like! (I used white cheddar, swiss, havarti, and asiago)

While the pasta is boiling (I would under cook it by a couple minutes), prepare the sauce as follows:

Melt butter in a saucepan. Stir in the flour, mustard, Worcestershire sauce, salt & pepper. Cook over low heat, stirring constantly until mixture is smooth and lightly bubbly. Stir in milk. Heat to boiling, stirring CONSTANTLY! Boil & stir 1 minute. Turn heat off. Stir in the cheese until melted.

Toss the pasta in the sauce and pout into an un-greased casserole dish. Bake uncovered for 10 - 20 minutes. Here, you have the option of topping it with more cheese or maybe crumbled Ritz crackers or bread crumbs - whatever you like! Buon Appetito!

And Voila! The birthday dinner was a success. We'll pretend this next picture is not of the girls spitting on the Birthday cake ;)

Tuesday, January 3, 2012

Soft Glazed Molasses Cookies!!!


I tell you now I am definitely NO BAKER!!! I just can't wrap my hands around the scientific methods behind measurements and leavening and wet/dry ingredients.....it's just too much for my brain to handle. I cook (and I can't even do that very well) only because I am at liberty to add a little of this, and a little of that at my discretion!! This could have something to do with the fact that my 100% Italian blood dictates a rather stubborn personality that does not lend itself to following directions very well. But that's just a theory....

So when I had to come up with something for a cookie exchange, I went with a cookie that I knew I would LOVE since I would have to spend ample time rebelling against my tendency to experiment and actually follow a recipe! I love those off-brand iced oatmeal cookies you find on the bottom shelf in the cookie aisles at the grocery store. I generally go through half a package in one sitting. And I also LOVE gingerbread cookies but I hate the labor involved in rolling out dough and cutting out shapes (I told you I was lazy). So this recipe is a combo of both my favorites and really is fool proof! After all, I have made it three times and perfectly each time!! I also suggest the use of a cookie scoop as it is my new FAVORITE kitchen tool! Try it for yourself:

GLAZED SOFT MOLASSES COOKIES

1 cup sugar
3/4 cup sour cream
1/2 cup butter
1/2 cup shortening
1/2 cup molasses
1 large egg
3 cups flour
1 1/2 tsp baking soda
1 TB cinnamon
1/2 tsp ground ginger
1/2 tsp salt

PREHEAT OVEN TO 350 DEGREES

Beat the sugar, sour cream, butter, shortening and egg together with a hand mixer. Stir in remaining ingredients. Drop dough with a cookie scoop on to parchment paper or un-greased cookie sheet and bake for 10 minutes, or until no indentation remains when pressed. Drizzle with glaze and eat em up!

GLAZE:

3 cups powdered sugar
1/3 cup butter (softened completely)
1 1/2 tsp vanilla
3 or more TBSP milk (more as needed to thin it out)

Mix until thin enough to either drizzle on in a cute pattern, or brush on with a brush while cookies are still warm. There is no way you could be disappointed with these cookies! ENJOY!!

The Mamma Meets the Cucina: COOKING WITH SPIRITS!


So the holidays have come and gone and our liquor cabinets are pretty much cleaned out. But don't write off those nearly empty bottles yet! With less than a cup of some of the most common spirits, you can have an awesome meal on the table with a huge wow factor. And the Mamma & the Cucina are battling again to show you just how to do it!

FROM THE CUCINA

Of all the liquors that I keep stored in my house (and aside from a variety of rums, there aren't many others), tequila seems to be the least used. Just a nice margarita on Cinco de Mayo and maybe a grill-out or two is all the time that I usually have for tequila. Yes...my Cuervo 'shot' days are way behind me. So when I started to plan for our Cooking with Spirits post, I figured it would be a good time to dust off the tequila bottle and put it to some good use!

This recipe is very simple and only uses a handful of ingredients. The the tequila lime marinade leaves a refreshing, zesty flavor that, although screams for a summer grill-out, can be enjoyed all year round and makes for a terrific party appetizer.

TEQUILA LIME CHICKEN BITES

INGREDIENTS:

6 uncooked skinless chicken tenders, cut into 2" pieces

1/3 cup silver/white tequila

juice of 4 limes, plus zest of 1 lime

1 tspn honey

1/4 cup chopped cilantro

4 ounces prosciutto, thinly sliced

2 tblspn butter

PREPARATION:

Whisk together the tequila, lime juice, lime zest, honey and cilantro. Place the cut chicken pieces into tequila mixture, let sit in fridge for at least two hours (a plastic baggie works well for this).

Remove chicken from marinade, discard marinade. Quarter each piece of the prosciutto (adjust size accordingly to fit around each chicken strip). Wrap each chicken strip with one piece of the prosciutto and secure with a toothpick.

Melt butter in a pan over medium-high heat. Place the prosciutto wrapped chicken in pan, cooking the chicken evenly on each side, until chicken is fully browned and prosciutto is slightly crisp.

Serve and enjoy!


FROM THE MAMMA
Sambuca is one of the liquors I remember from my childhood. After dinner my parents and grandparents would have a small glass over ice, or even put some in their coffee. I, personally, never liked the stuff, but I find that the naturally sweet flavor really enhances savory dishes for a sweet & salty effect! Sambuca is often used in cooking with prawns or lamb, but I went with shrimp. So my food-blogging brain did a little talking with my Italian stomach and I invented the following recipe:

SAMBUCA SHRIMP:

INGREDIENTS
12 shrimp, trimmed & deveined
1 TB olive oil
4 TB butter
3 TB minced shallots
juice of one small lemon
1/4 cup Sambuca
salt, pepper, crushed red pepper to taste

Saute the shallots in 1 Tablespoon olive oil and 1 Tablespoon butter until transparent. (You want to sweat the shallots, meaning you cook them without any color or browning). Add in the shrimp and sprinkle with salt, pepper, and plenty of crushed red pepper. Cook for about 1 minute on each side. Remove the shrimp. Add the sambuca and cook for 5 minutes on medium-high heat.

Then add the lemon juice and the remaining TB of butter and simmer lightly until you get kind of a thin glaze. Then, throw the shrimp back in and toss it all together. Turn the heat off (you do not want to overcook the shrimp,a s the heat alone will finish the cooking process). Serve immediately over rice pilaf, or alongside roasted veggies. I served mine with brown rice since we are trying to keep that New Year's resolution of eating healthy! MANGIA!!

DON'T FORGET TO VOTE ON WHICH LIQUOR YOU WOULD PREFER AS AN INGREDIENT!!! SEE THE POLL ON THE RIGHT SIDEBAR OF THIS BLOG!

Related Posts Plugin for WordPress, Blogger...